

AI writing tools are useful, but most of them still work like single-purpose assistants.
You ask for an article.
The tool writes the article.
Then you manually search for images, copy everything into WordPress, format the post, add credits, and save the draft.
That workflow is faster than writing everything from scratch, but it is not truly automated.
A multi-agent setup works differently.
Instead of asking one AI assistant to do everything, you create a small team of specialized agents. One agent coordinates the task, another finds images, and another prepares the WordPress draft.
The result is a more realistic publishing workflow: one natural language instruction can turn into a researched, illustrated WordPress draft that is ready for human review.
This guide walks through how to build that system using Apteva, WordPress, MCP, and Pixabay.
By the end, you will have a basic AI publishing team made of three agents:
- A Coordinator Agent that receives your request and assigns work.
- An Image Agent that searches Pixabay for relevant visuals.
- A WordPress Agent that creates the article draft inside WordPress.
The goal is not to remove editors from the process. The goal is to automate the repetitive setup work while keeping final publishing decisions in human hands.
What You Need Before Starting
Before building the workflow, prepare the following:
- An Apteva account or local Apteva installation.
- A WordPress website where you have admin access.
- A Pixabay API key.
- Permission to install and configure WordPress plugins.
- Basic familiarity with the WordPress admin area.
You do not need to write custom code for this basic version.
The setup mainly involves connecting services, creating agents, assigning each agent the right capabilities, and testing the workflow from the Coordinator chat.
A realistic setup time is around 20 to 30 minutes if you already have your WordPress login and API key ready.
Why This Workflow Uses MCP
MCP stands for Model Context Protocol.
In simple terms, MCP allows AI agents to communicate with external tools in a structured way. Instead of an AI model only producing text, it can call connected tools, send requests, receive results, and perform actions.
In this workflow, MCP acts as the bridge between your AI agents and the services they need:
- WordPress MCP lets an agent create or update WordPress content.
- Pixabay MCP lets an agent search for suitable images.
- Apteva manages the agents and coordinates communication between them.
This is what makes the system more powerful than a normal AI chat.
The agent is not only describing what should happen. It can actually interact with the connected tools.
Step 1: Install the WordPress MCP Plugin
Start inside your WordPress dashboard.
Go to:
Plugins → Add New
Search for:
Stifli Flex MCP
Install and activate the plugin.
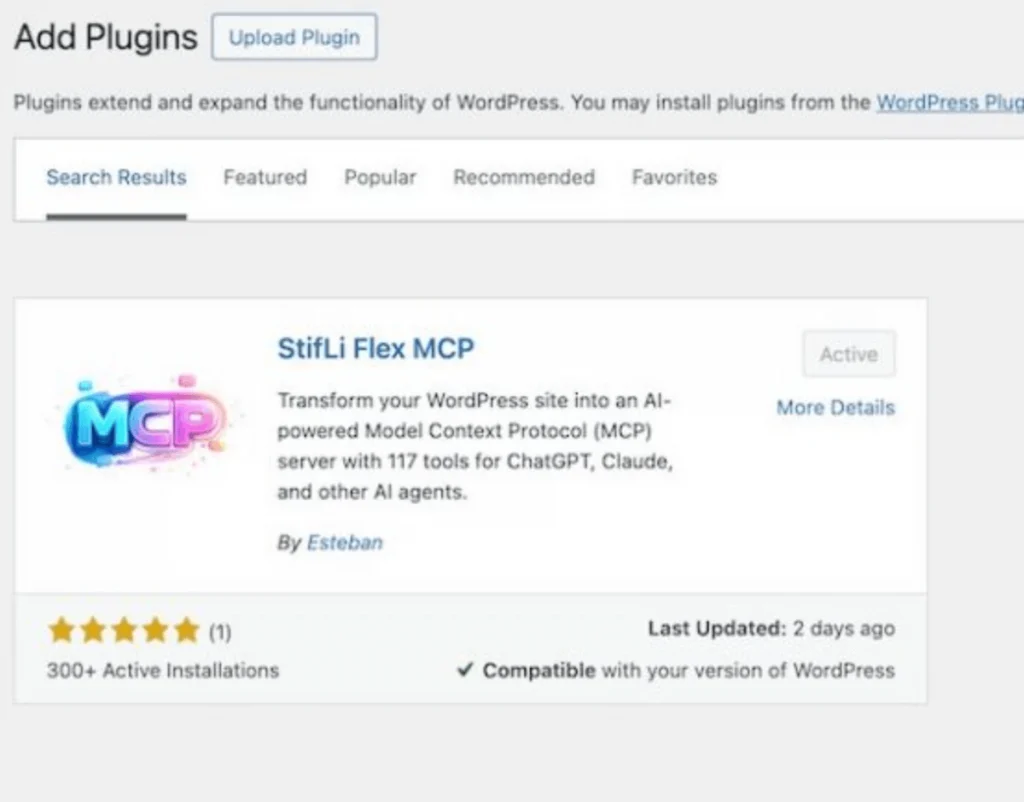
This plugin turns your WordPress website into an MCP-compatible endpoint.
Once activated, it gives your AI system a secure way to communicate with your WordPress installation and perform supported actions.
For this tutorial, the most important action is creating a WordPress post draft.
Step 2: Configure WordPress MCP Authentication
After activating the plugin, go to:
Settings → Stifli Flex MCP
You should see the plugin settings screen with authentication information.
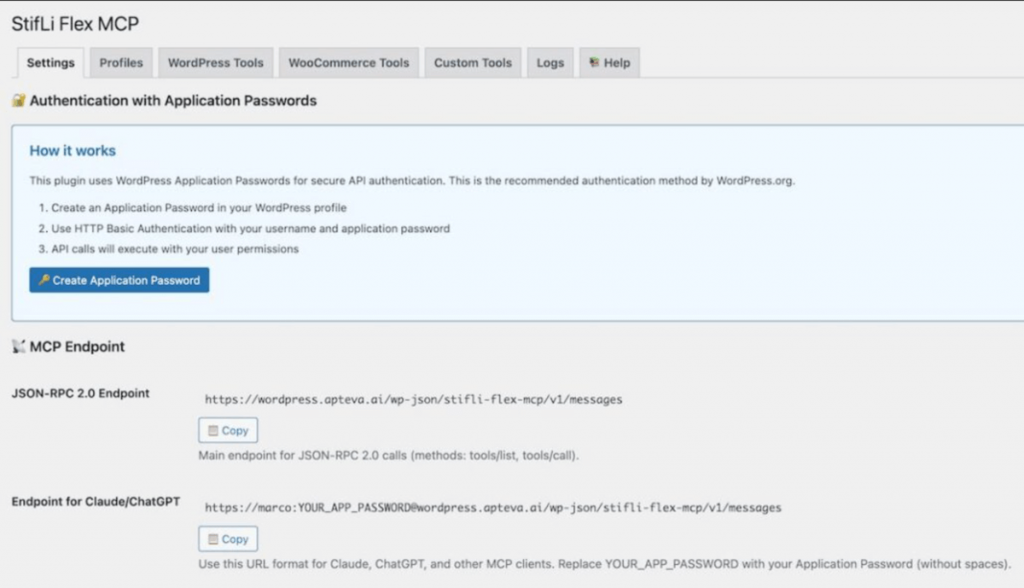
The plugin uses WordPress Application Passwords for authentication.
Create an application password and store it somewhere safe. Treat it like a real password. If someone else gets access to it, they may be able to interact with your site through the connected MCP tools.
You will need three pieces of information:
- Your WordPress username.
- Your WordPress application password.
- The MCP endpoint URL.
The endpoint usually follows a structure like this:
https://example.com/wp-json/stifli-flex-mcp/v1/messages
Depending on the tool configuration, you may also see a formatted endpoint that includes the username and application password directly in the URL.
For a production environment, avoid sharing that URL publicly and revoke the application password immediately if it is exposed.
Step 3: Connect the WordPress MCP Server in Apteva
Now open Apteva.
In the left sidebar, go to:
MCP → Add Server
Choose:
HTTP Endpoint
Then configure the WordPress server.
Suggested setup:
| Field | Value |
|---|---|
| Name | WordPress |
| Scope | Global |
| URL | Your WordPress MCP endpoint |
| Username | Your WordPress username |
| Password | Your application password |
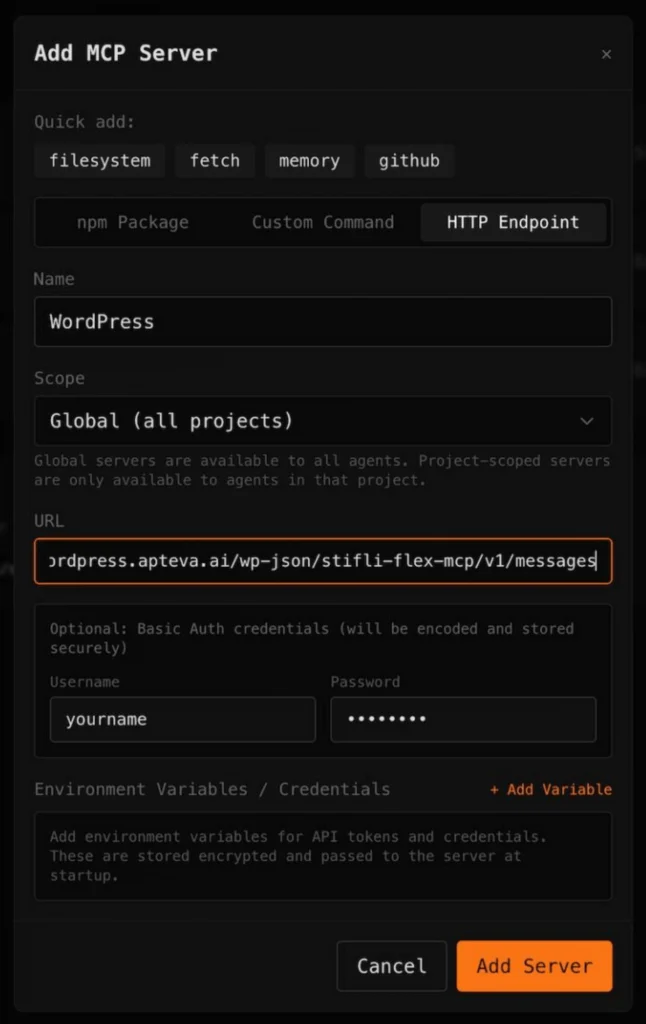
Save the server.
This gives Apteva a way to send WordPress-related tasks to the site.
Later, you will assign this MCP server to the WordPress Agent only. The Coordinator will not need direct WordPress access.
That separation is important.
A good multi-agent workflow should avoid giving every agent every permission. Each agent should only have the tools it needs to do its job.
Step 4: Connect the Pixabay MCP Server
The Image Agent needs a way to search for images.
For this tutorial, use Pixabay.
In Apteva, add another MCP server:
MCP → Add Server
This time, choose:
npm Package
Configure it like this:
| Field | Value |
|---|---|
| Name | PixaBay |
| Scope | Global |
| npm Package | pixabay-mcp |
| Environment Variable | PIXABAY_API_KEY |
| Value | Your Pixabay API key |
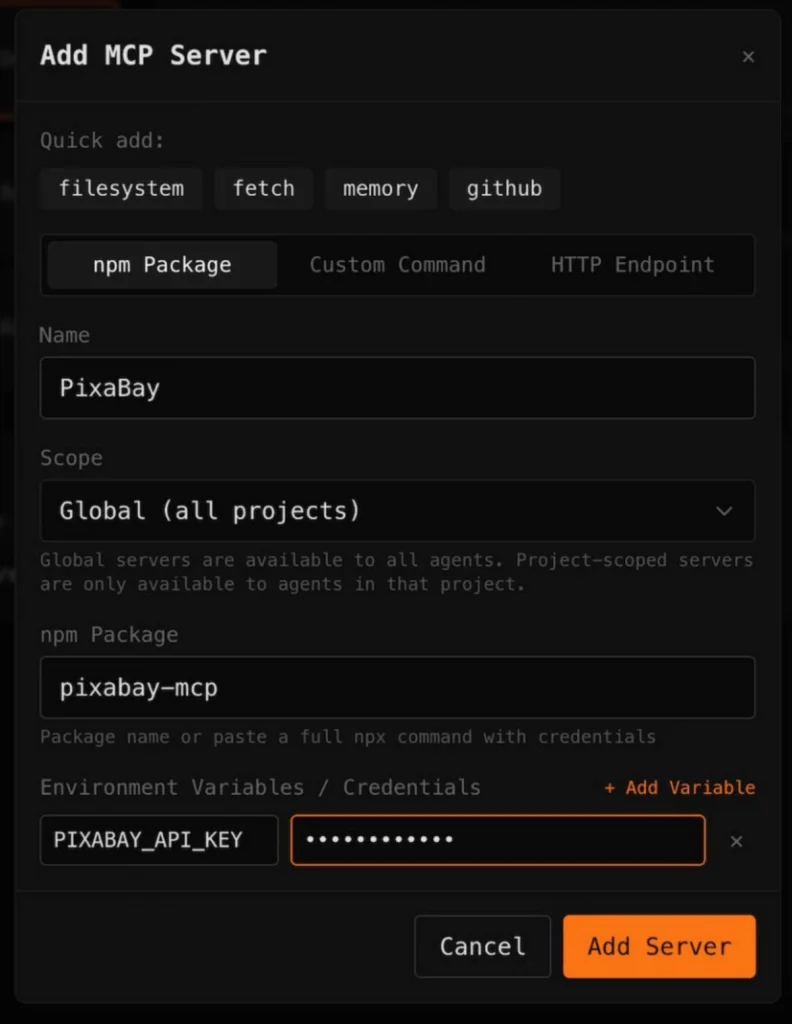
After saving, go back to your MCP server list and confirm that both servers are available.
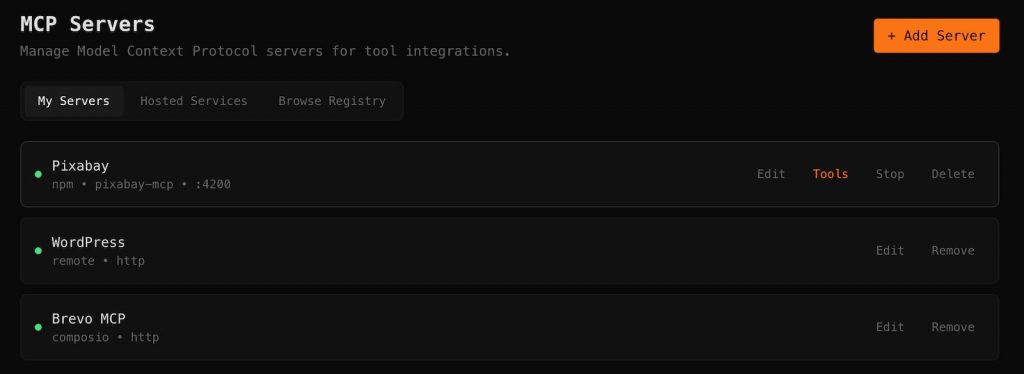
You should now have two active tool connections:
- WordPress for publishing tasks.
- Pixabay for image research.
If either server does not start, check the credentials first. Most connection problems come from an incorrect API key, revoked WordPress application password, wrong endpoint URL, or inactive WordPress plugin.
Step 5: Create the Coordinator Agent
Now it is time to build the agent team.
Start with the Coordinator Agent.
This is the agent you will talk to directly. It receives your request, understands the goal, splits the job into smaller tasks, and sends those tasks to the worker agents.
In Apteva, go to:
Agents → New Agent
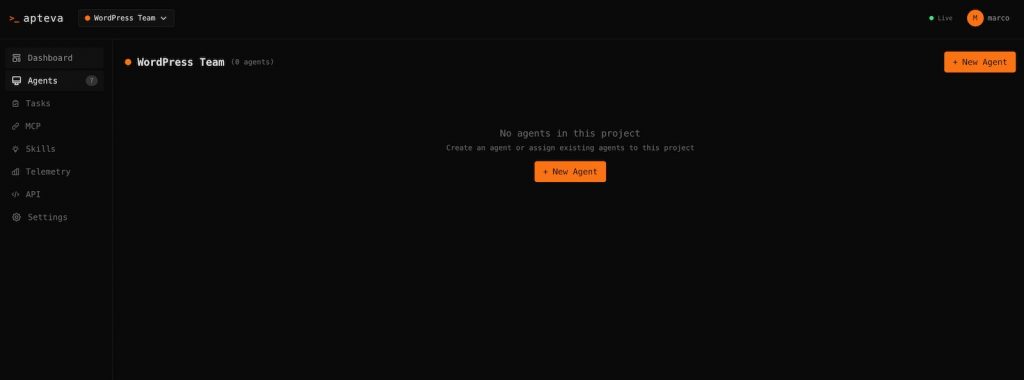
Configure the Coordinator like this:
| Setting | Value |
|---|---|
| Name | Coordinator |
| Project | WordPress Team |
| Provider | Anthropic |
| Model | Claude Haiku 4.5 |
| System Prompt | You are a coordinator agent. |
Enable:
- Memory
- Multi-Agent
Set Multi-Agent Mode to:
Coordinator
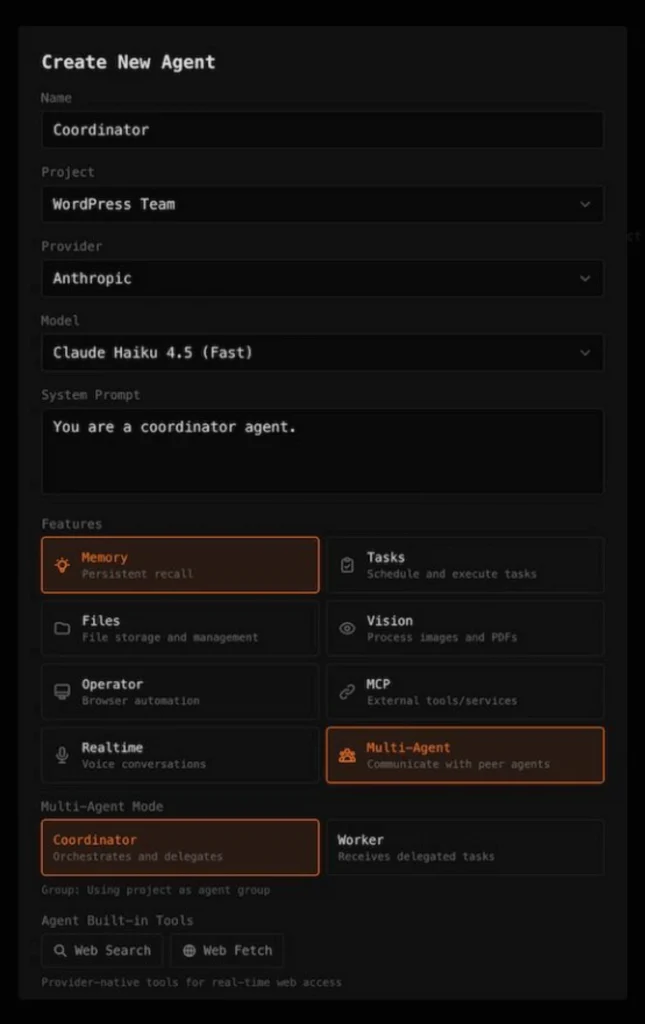
Do not give this agent direct MCP access.
That may sound limiting, but it is intentional.
The Coordinator should not personally search images or create WordPress posts. Its job is to manage the workflow and delegate tasks to the agents that have the correct tools.
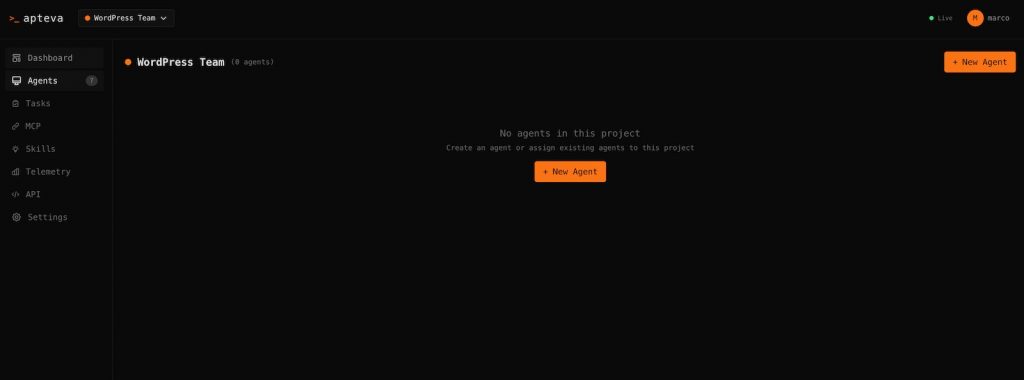
After saving, the Coordinator should appear inside your WordPress Team project.
Step 6: Create the Image Agent
Next, create the first worker agent.
The Image Agent is responsible for searching for relevant visuals and returning suitable image options with attribution information.
Create a new agent and configure it like this:
| Setting | Value |
|---|---|
| Name | Image Agent |
| Project | WordPress Team |
| Provider | Anthropic |
| Model | Claude Haiku 4.5 |
| System Prompt | You are an image researcher agent. |
Enable:
- Memory
- Vision
- MCP
- Multi-Agent
Set Multi-Agent Mode to:
Worker
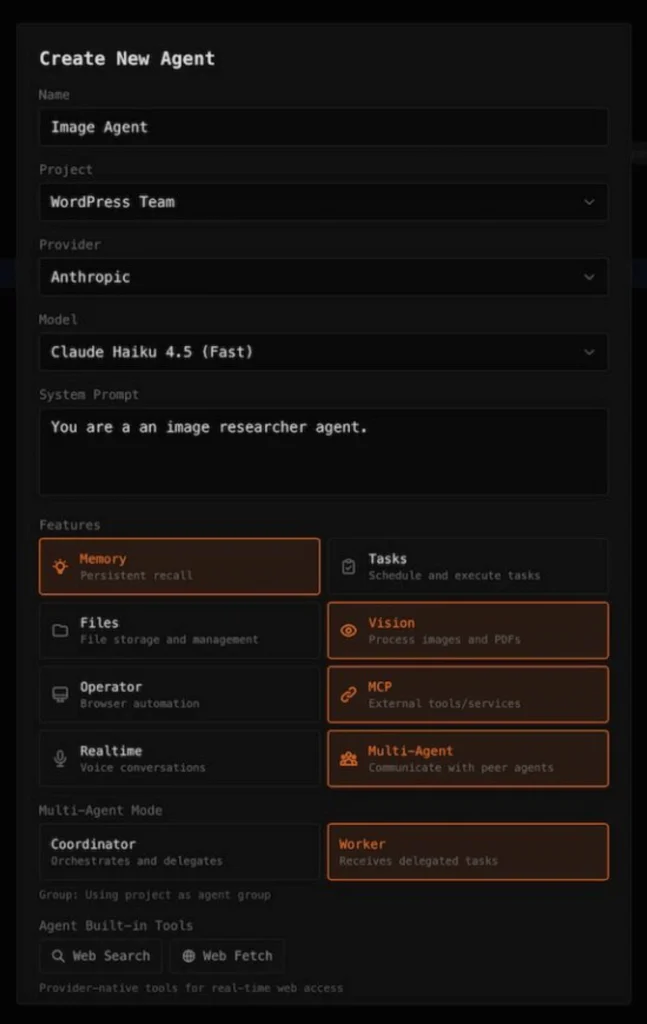
Then assign the Pixabay MCP server to this agent.
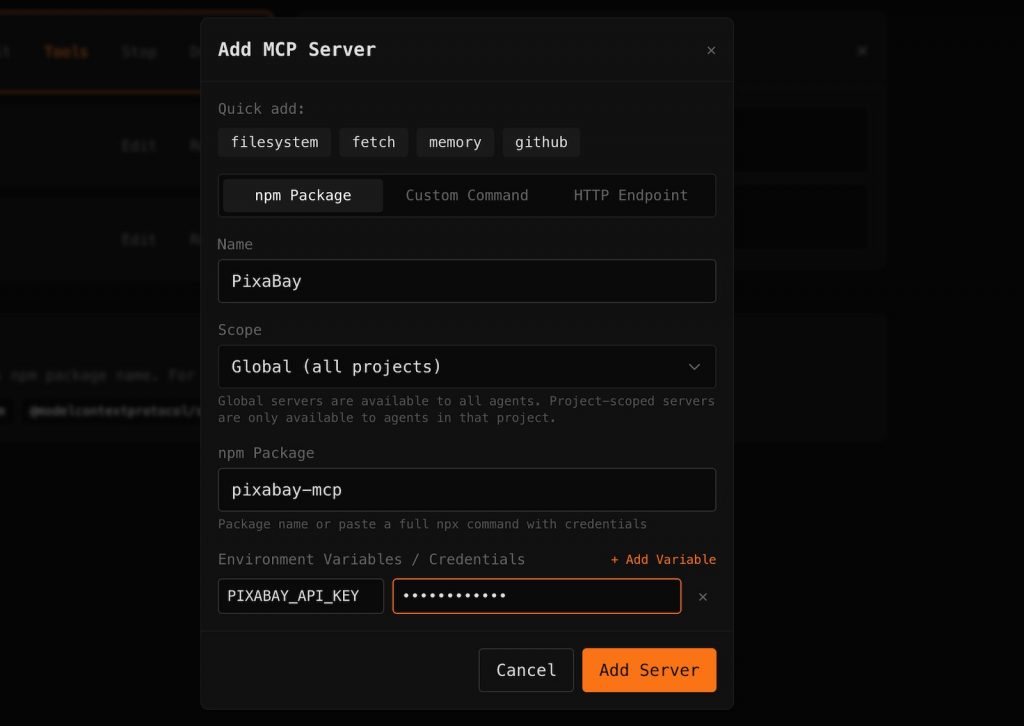
This gives the Image Agent the ability to search for images while keeping its role narrow.
A useful Image Agent should be able to:
- Understand the topic of the article.
- Search for relevant visual concepts.
- Select images that match the tone of the article.
- Provide proper credit information.
- Return image URLs or embed-ready information to the publishing workflow.
For a real editorial workflow, you may want the Image Agent to follow additional rules, such as avoiding generic stock photos, preferring landscape images, or selecting visuals that match your brand style.
Step 7: Create the WordPress Agent
Now create the second worker agent.
The WordPress Agent is responsible for preparing the article and saving it as a WordPress draft.
Create a new agent with this setup:
| Setting | Value |
|---|---|
| Name | WordPress Agent |
| Project | WordPress Team |
| Provider | Anthropic |
| Model | Claude Haiku 4.5 |
| System Prompt | You are a WordPress agent. |
Enable:
- Memory
- MCP
- Multi-Agent
Set Multi-Agent Mode to:
Worker
Assign the WordPress MCP server to this agent.
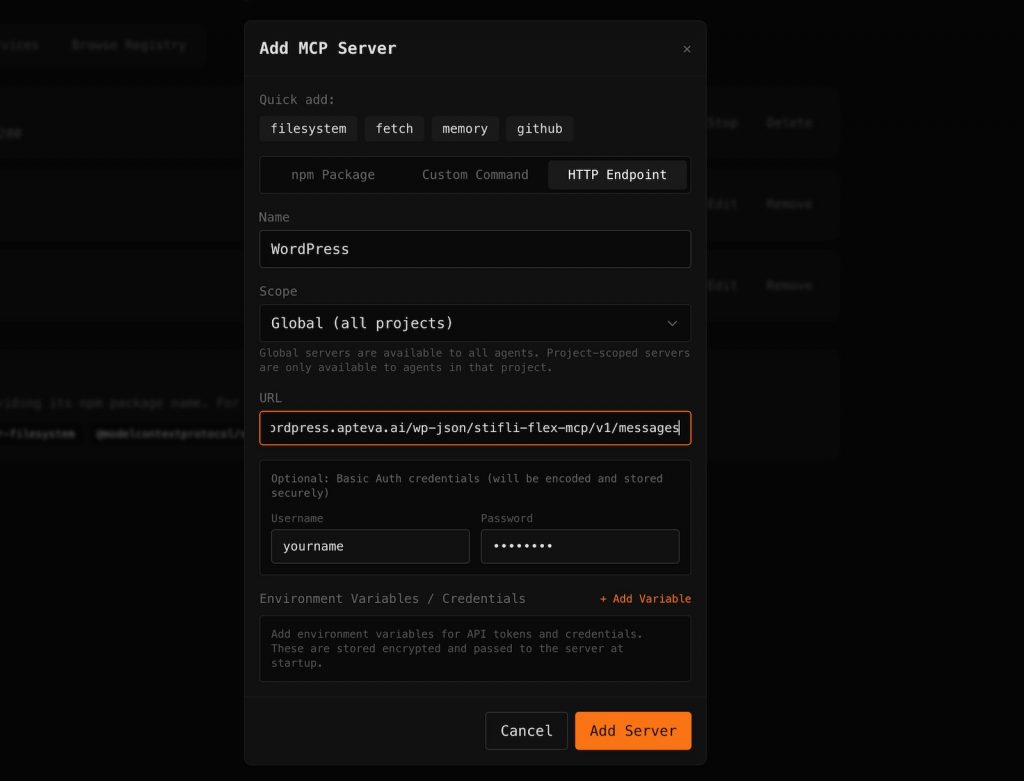
This agent does not need Vision because it is not analyzing images directly. It only needs to receive the content and image information, then prepare the WordPress draft.
Keeping its capabilities focused makes the system easier to control.
A good WordPress Agent should be instructed to:
- Create posts as Draft, not Published.
- Use proper headings.
- Add image credits where required.
- Keep formatting clean.
- Avoid publishing without human approval.
- Return the draft title and confirmation after completion.
Step 8: Start and Review the Full Agent Team
You should now have three agents:
- Coordinator
- Image Agent
- WordPress Agent
Start all three agents and confirm they are running.
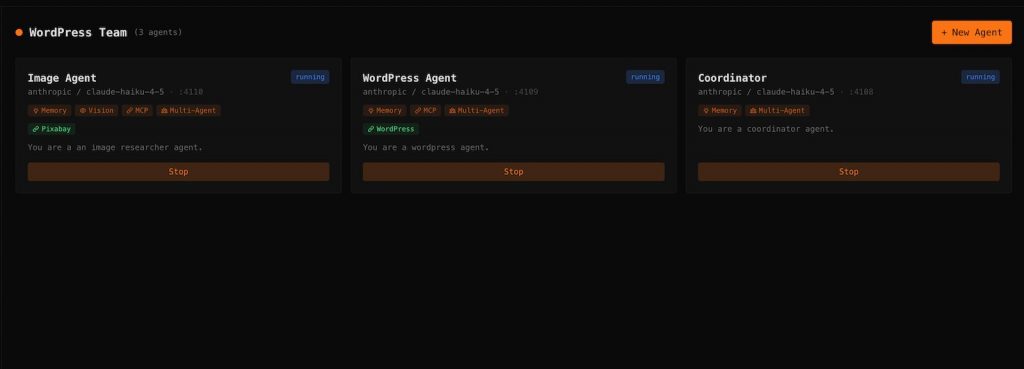
Your basic architecture now looks like this:
User
 ↓
Coordinator Agent
 ↓
 ├── Image Agent → Pixabay MCP
 ↓
 └── WordPress Agent → WordPress MCP
The Coordinator receives the request.
The Image Agent searches for visuals.
The WordPress Agent writes and prepares the draft.
The Coordinator reports the result back to you.
This structure is simple, but it is powerful because each agent has a clear responsibility.
Step 9: Run the First Publishing Test
Open the Coordinator Agent chat.
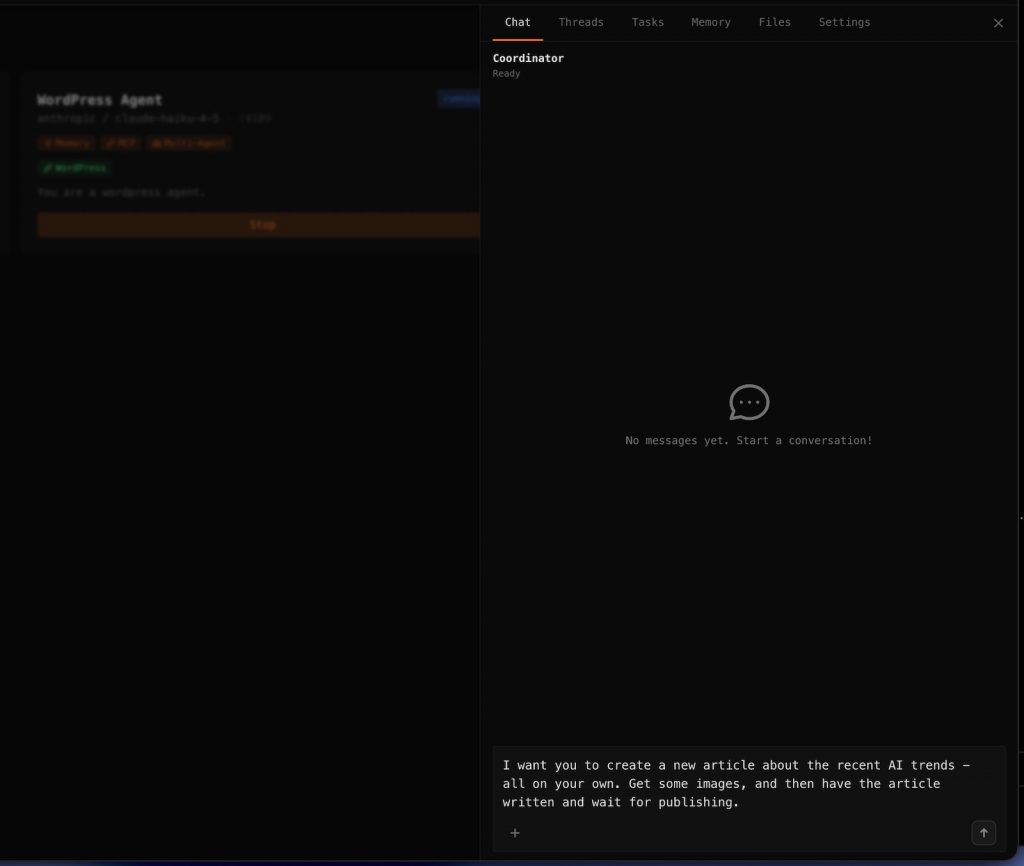
Send a command like this:
Create a new article about recent AI trends.
Find suitable images, include image credits, write the article, and save it as a WordPress draft.
Do not publish it. Wait for human review.
The Coordinator should understand the request and divide the work.
It will usually perform a sequence like this:
- Ask the Image Agent to find relevant visuals.
- Ask the WordPress Agent to write and structure the article.
- Send the draft to WordPress through the WordPress MCP connection.
- Report back with a summary of what was created.
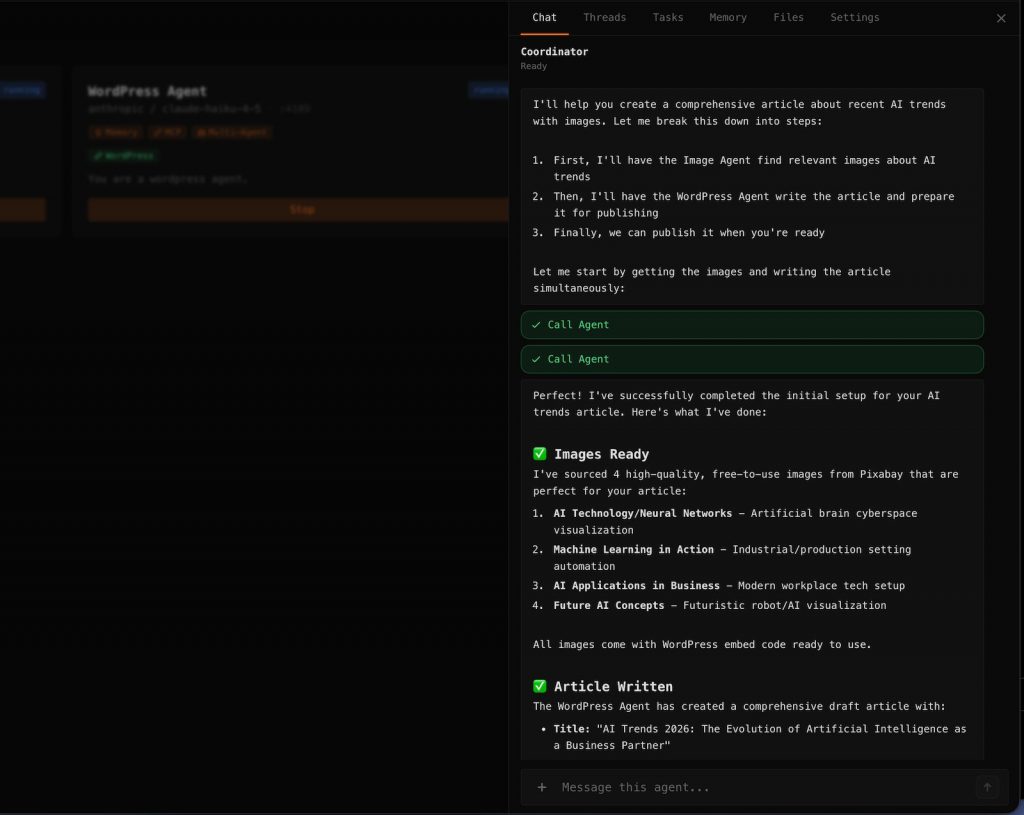
The exact output will depend on your model, prompts, and connected tools, but the workflow should result in a WordPress draft rather than a published post.
That is important.
For content operations, AI should support production, not bypass editorial review.
Step 10: Check the Draft in WordPress
Go back to your WordPress admin dashboard and open:
Posts → All Posts
You should see a new draft created by the workflow.
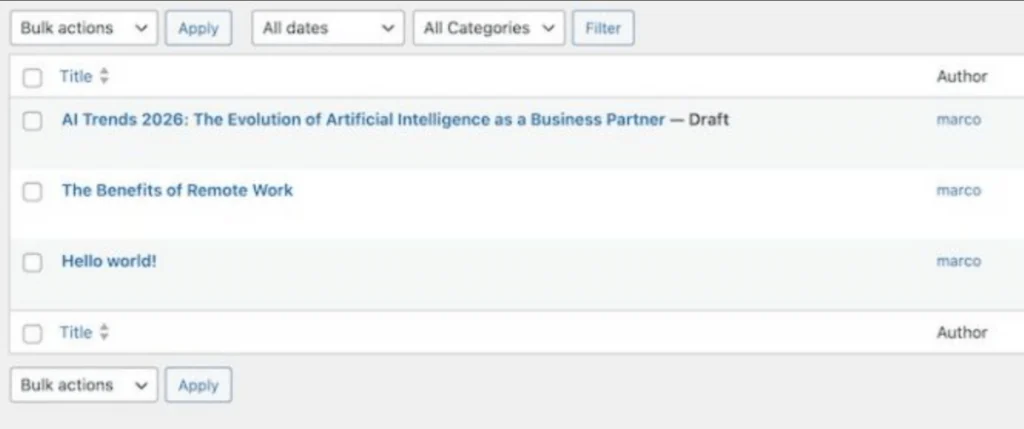
Open the draft and review the article.
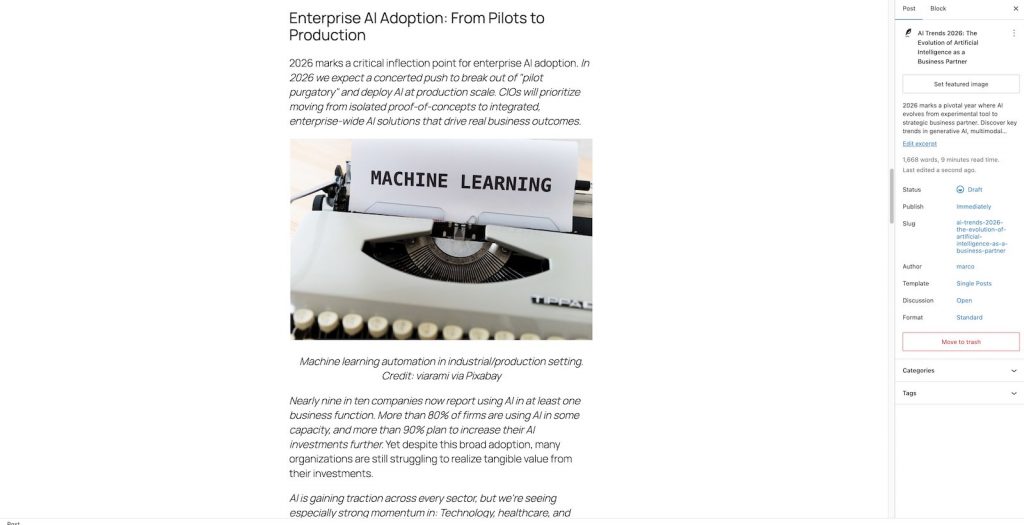
Check the following before publishing:
- Is the title accurate?
- Does the article match your intended topic?
- Are headings formatted correctly?
- Are the images relevant?
- Are image credits included?
- Are there any unsupported factual claims?
- Does the article need internal links?
- Does the article need SEO metadata?
- Does the tone match your publication?
The best version of this workflow is not fully automatic publishing.
The best version is automated draft preparation.
AI handles the first pass. A human editor makes the final decision.
Why Multi-Agent Architecture Works Better Than One Big Prompt
You could ask one AI assistant to search for images, write the article, format everything, and publish to WordPress.
For very simple tasks, that might work.
But as the workflow becomes more complex, one-agent systems become harder to control.
A multi-agent system has several advantages.
1. Clearer Responsibilities
Each agent has one job.
The Image Agent does not need to understand WordPress publishing. The WordPress Agent does not need to search Pixabay. The Coordinator does not need direct access to external tools.
This keeps the system cleaner.
2. Safer Permissions
Not every agent needs access to every service.
Only the WordPress Agent needs WordPress permissions. Only the Image Agent needs Pixabay access.
This reduces unnecessary risk.
3. Easier Debugging
If images fail, you know where to look.
Check the Image Agent and Pixabay MCP server.
If the draft does not appear in WordPress, check the WordPress Agent and WordPress MCP server.
This is much easier than debugging one large assistant with too many responsibilities.
4. Easier Scaling
Once the structure works, you can add more agents.
For example:
- SEO Agent
- Editor Agent
- Fact-Checking Agent
- Translation Agent
- Newsletter Agent
- LinkedIn Agent
- Featured Image Agent
- Internal Linking Agent
Each new agent can be added to the workflow without rebuilding the whole system.
Better System Prompts for Production Use
The basic prompts in the setup are intentionally simple.
For production, you should make them more detailed.
Coordinator Agent Prompt
You are a content publishing coordinator for a WordPress editorial workflow.

When the user requests an article:
1. Clarify the topic only if the request is too vague.
2. Ask the Image Agent to find 3 to 5 relevant images.
3. Ask the WordPress Agent to create a complete article draft.
4. Ensure the post is saved as Draft, never Published.
5. Confirm the title, topic, and draft status when the task is complete.
6. Do not bypass human editorial review.
Image Agent Prompt
You are an image research agent for WordPress articles.

Your job is to find relevant, high-quality images for the article topic.
Prioritize images that are clear, professional, and suitable for editorial use.
Return the image URL, creator credit, source, and a short reason why each image fits the article.
Avoid irrelevant, low-quality, or overly generic visuals.
WordPress Agent Prompt
You are a WordPress publishing agent.

Your job is to create clean WordPress article drafts.
Always save posts as Draft.
Use a clear title, logical headings, short paragraphs, and proper image placement.
Include image credits when images are provided.
Do not publish posts without explicit human approval.
Return the draft title and confirmation after completion.
These prompts make the workflow more consistent.
The more precisely you define each agent’s role, the less you rely on guesswork.
Adding an SEO Agent
Once the basic system works, the next useful addition is an SEO Agent.
This agent could review the article before it is saved or after the first draft is created.
Its responsibilities might include:
- Suggesting an SEO title.
- Writing a meta description.
- Recommending a URL slug.
- Checking heading structure.
- Suggesting internal links.
- Identifying missing subtopics.
- Recommending FAQ sections.
- Adding schema suggestions.
A simple SEO Agent prompt could be:
You are an SEO review agent for WordPress articles.

Review article drafts before publication.
Suggest an SEO title, meta description, URL slug, internal-link opportunities, and missing sections.
Do not rewrite the full article unless asked.
Focus on practical improvements that help search visibility and reader clarity.
You can keep this agent separate from the WordPress Agent.
That way, the SEO Agent gives recommendations while the WordPress Agent handles publishing actions.
Adding a Human Editor Step
The safest production workflow should include a human editor.
A simple editorial process could look like this:
User request
 ↓
Coordinator
 ↓
Image Agent
 ↓
Writer / WordPress Agent creates draft
 ↓
SEO Agent reviews draft
 ↓
Human editor reviews and approves
 ↓
Post is published manually
This prevents AI from becoming an uncontrolled publishing system.
It also protects your brand from problems such as:
- Incorrect facts.
- Weak arguments.
- Generic writing.
- Poor image choices.
- Broken formatting.
- Missing attribution.
- Unclear calls to action.
- Over-optimized SEO content.
Automation should remove repetitive work, not remove accountability.
Adding Social and Newsletter Agents
After WordPress draft creation, you can extend the same architecture to distribution.
For example, a LinkedIn Agent could create a post based on the article.
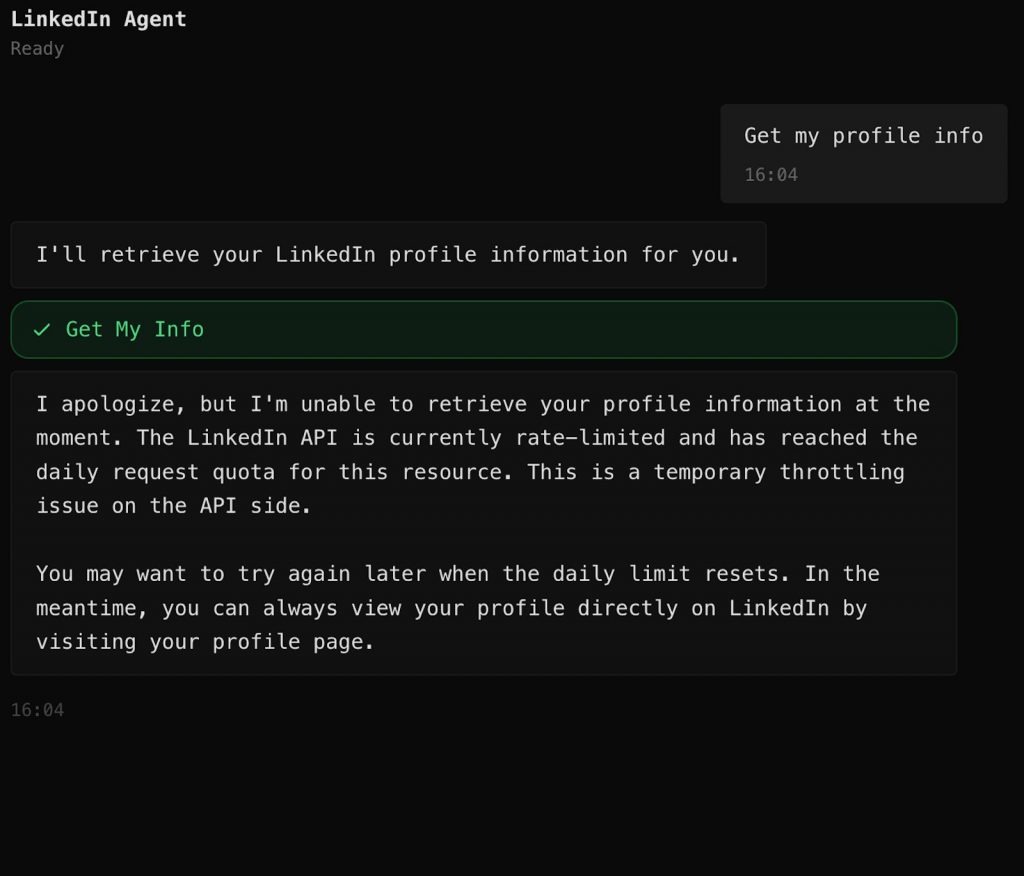
A Newsletter Agent could turn the article into an email summary.
A Social Agent could prepare variations for X, Facebook, LinkedIn, or Threads.
A Translation Agent could create localized versions.
A Repurposing Agent could create:
- A short LinkedIn post.
- A newsletter intro.
- A YouTube description.
- A tweet thread.
- A short-form video script.
- A summary for internal Slack.
This is where multi-agent workflows become more valuable.
The original article is only one output. The same content can be transformed into multiple publishing assets.
Common Problems and Fixes
MCP Server Will Not Connect
Check your credentials first.
For WordPress:
- Confirm the Stifli Flex MCP plugin is activated.
- Confirm the endpoint URL is correct.
- Confirm the application password has not been revoked.
- Confirm the WordPress user has the right permissions.
For Pixabay:
- Confirm the API key is valid.
- Confirm the environment variable is named correctly.
- Confirm the MCP server is running.
Agent Is Stopped
If an agent shows as stopped, start it manually from the agent card.
If it still does not start, check whether the required features are enabled.
For example:
- Coordinator needs Multi-Agent mode.
- Image Agent needs MCP and Vision.
- WordPress Agent needs MCP.
- Worker agents should be set to Worker mode.
- Coordinator should be set to Coordinator mode.
Images Are Not Returned
Check that the Image Agent has the Pixabay MCP server assigned.
Also check your Pixabay API quota and confirm the API key is still active.
If image results are poor, improve the Image Agent prompt. Tell it what image style, orientation, and quality level you expect.
WordPress Draft Is Not Created
This usually means the WordPress MCP connection is failing.
Check:
- WordPress endpoint URL.
- Username.
- Application password.
- Plugin activation status.
- WordPress user role.
- Whether the WordPress Agent has the WordPress MCP server assigned.
The Article Is Too Generic
This is a prompt quality issue.
Improve the Coordinator or WordPress Agent prompt by adding:
- Target audience.
- Article angle.
- Tone of voice.
- Required sections.
- Sources to consider.
- SEO intent.
- Examples of articles you like.
- Things to avoid.
A better input creates a better draft.
Practical Safety Rules
Before using this workflow for real publishing operations, set clear rules.
Always Create Drafts First
Do not let the system publish directly until you fully trust the workflow.
Even then, direct publishing should be used carefully.
Use Limited Permissions
Do not give agents admin-level access unless they truly need it.
Create a dedicated WordPress user for the workflow if possible.
Keep API Keys Private
Never paste application passwords or API keys into public documents, screenshots, or shared chats.
If a key is exposed, revoke it and create a new one.
Review Image Licensing
Pixabay images are generally designed for free use, but you should still review the licensing terms and attribution requirements for your own publishing standards.
Add Editorial Review
AI-generated drafts should be reviewed by a person before publication.
This is especially important for topics involving health, finance, legal information, product claims, or technical tutorials.
Final Thoughts
A multi-agent AI publishing team gives WordPress creators a different way to think about automation.
Instead of using AI as a single writing assistant, you can design a small editorial system:
- One agent manages the task.
- One agent finds images.
- One agent prepares the WordPress draft.
- Additional agents can handle SEO, translation, newsletters, or social media.
The first version does not need to be complex.
A Coordinator, Image Agent, and WordPress Agent are enough to demonstrate the core idea.
From there, you can expand the workflow based on your actual publishing needs.
For bloggers, this can reduce repetitive production work.
For agencies, it can standardize content workflows across client sites.
For publishers, it can create a faster draft pipeline without removing editorial control.
For WordPress product teams, it can become the foundation of documentation, tutorials, release notes, and marketing content.
The real advantage is modularity.
You are not building one giant AI assistant that tries to do everything. You are building a team of focused agents that can cooperate, use tools, and hand work back to you for review.
That is a more practical model for real WordPress publishing.
AI should not replace your editorial judgment.
It should give you a faster first draft, a cleaner workflow, and more time to focus on the parts of publishing that still require human taste, accuracy, and strategy.